

Use Users & Access in delegation.almma.ai to invite teammates and control what they can see and do. You can grant full admin access or limit a user to specific locations and delegations–and revoke access at any time.
What You’ll Need
- You must be an Organization Owner or Admin to invite users and manage access.
- You’ll need the person’s email address.
Step 1: Open “Users & Access”
- Log in to delegation.almma.ai.
- In the left sidebar, click Users & Access.
- Click the Invite button (top-right).

Step 2: Invite a Person
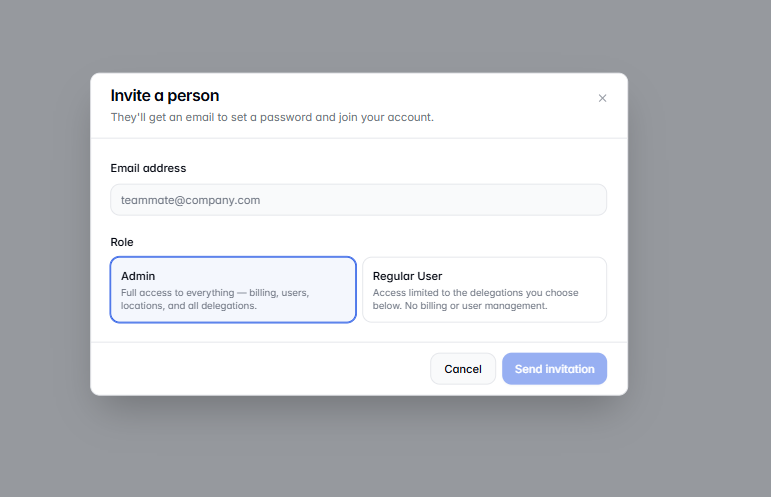
After clicking Invite, you’ll see the Invite a person window. Enter the teammate’s email and choose a role:
Option A: Admin (Full Access)
Select Admin if you want the user to have full access to the entire account. Admins can access and manage:
- Billing
- Users
- Locations
- All delegations
Note: If you choose Admin, you do not need to select locations—admins automatically have access to all locations under the account.
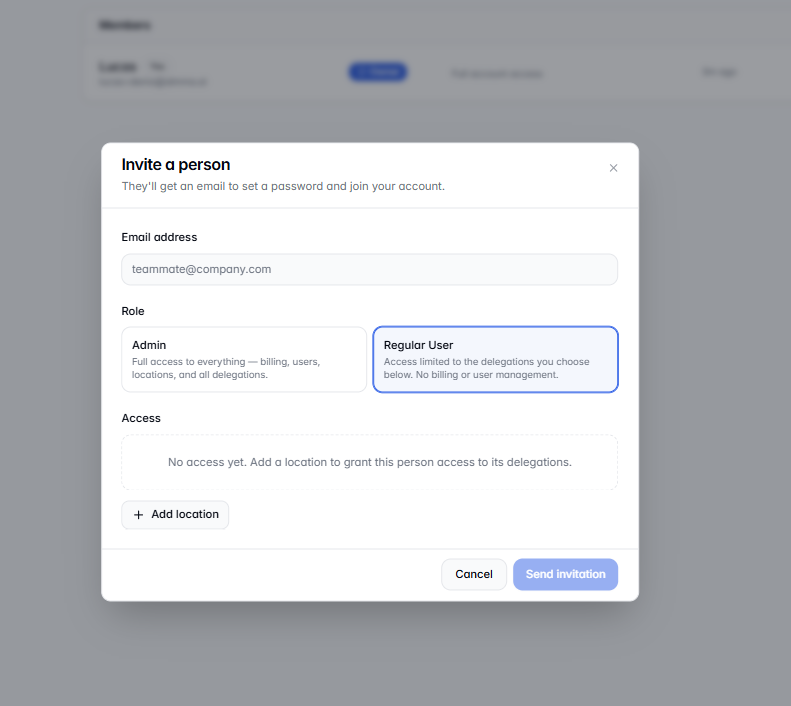
Option B: Regular User (Limited Access)
Select Regular User when you want to limit what the person can access. Regular users can be restricted to specific locations and delegations, and they do not get billing or user-management permissions.

Step 3: Configure Access for a Regular User
If you selected Regular User, use the Access section to define exactly what they can do.
- Click Add Location.
- Select one of the active locations under your account.
- Set the user’s Access level for that location:
- View only (read-only)
- Full access (can actively work within what you’ve granted)
- Set Delegations access:
- All (the user can access all delegations in that location)
- Specific (choose only certain delegations)
When everything looks right, click Send invitation.
Step 4: Confirm the Invitation Was Sent
Back on the Users & Access page, you’ll see the invite under Pending invitations. From here, you can typically:
- Resend an invitation if the user didn’t receive it
- Cancel a pending invitation if you sent it to the wrong person

How to Revoke Access
Access can be revoked at any time by an Organization Admin or Owner. To remove access:
- Go to Users & Access.
- Find the person in the members list (or locate their pending invitation).
- Remove their access (or cancel the invite).
Security best practice: If someone no longer needs access (role change, contractor offboarding, team changes), revoke access immediately.
Troubleshooting Tips
- User can’t see what they need: Confirm they were added to the correct location and that delegations are set to All or the correct Specific delegations.
- User didn’t receive the invite email: Ask them to check spam/junk, then use Resend under Pending invitations.
- Gave the wrong access level: Revoke access and re-invite (or adjust permissions if your admin controls allow in-place editing).
Summary
- Use Users & Access → Invite to add teammates.
- Choose Admin for full account access (no location selection needed).
- Choose Regular User to limit access by location, access level, and delegations.
- Admins/Owners can revoke access at any time.
Leave a Reply