

Empowering collaborative AI work through seamless team management
Introduction
At Almma.AI, we’re committed to democratizing artificial intelligence by making powerful tools accessible to teams of all sizes. Our team management feature in AlmmaGPT enables organizations to collaborate efficiently while maintaining control over subscriptions and access levels.
This guide walks you through the simple process of creating a team and managing subscriptions for your members—a frictionless experience designed with the same attention to usability that defined my work at Apple.
Why Teams Matter
Teams in AlmmaGPT aren’t just about shared access—they’re about amplifying collective intelligence.
By bringing your team members together in a unified workspace, you enable:
- Collaborative AI workflows across departments
- Flexible subscription management with mixed free and paid tiers
- Centralized billing for simplified administration
- Shared resources and knowledge across your organization
Step-by-Step Guide to Creating Your Team
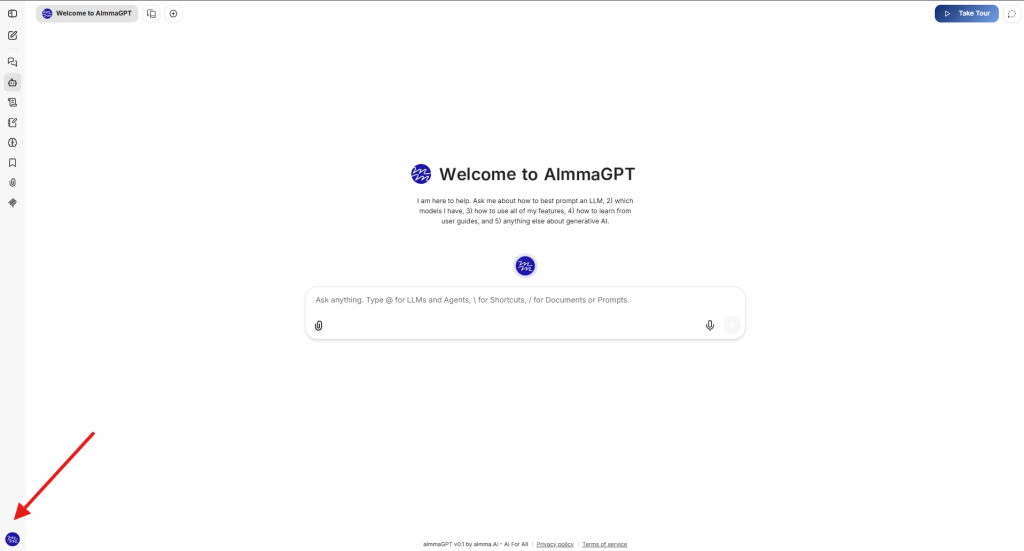
Step 1: Access Your Profile Menu
Begin your team creation journey by locating the user profile icon in the bottom left corner of the AlmmaGPT interface.
Action: Click your profile icon in the bottom-left corner of the screen.
Step 2: Navigate to Team Management
Once you’ve opened the profile menu, you’ll see several options including “My Teams.” This is your gateway to team collaboration.
Action: Click on “My Teams” from the menu options.

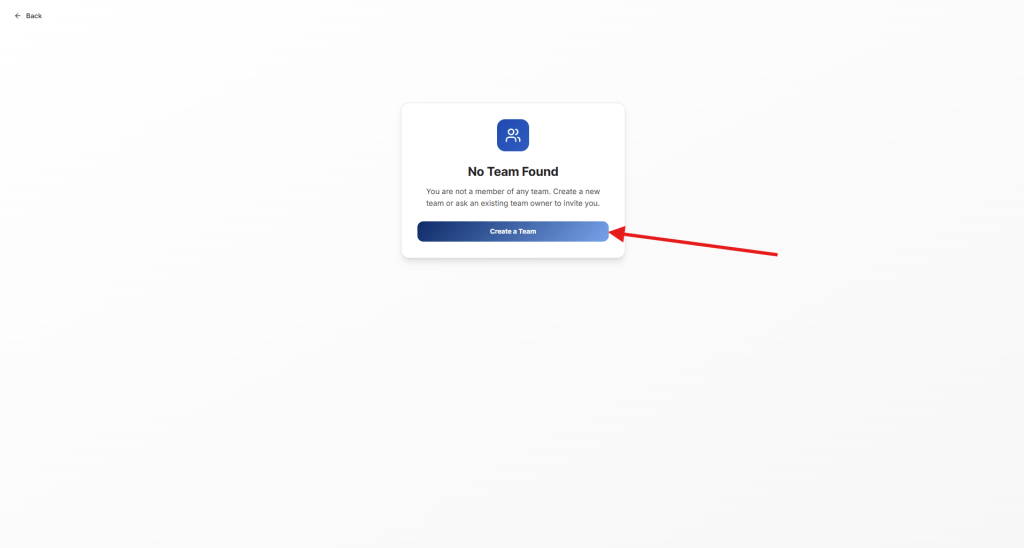
Step 3: Initiate Team Creation
If you’re not already part of a team, you’ll see a clean, focused interface with a clear call-to-action.
The “Create a Team” button is prominently displayed, eliminating any guesswork about your next step.
Action: Click the “Create a Team” button to begin setting up your new team.
Step 4: Name Your Team
Your team needs an identity that resonates with its purpose. Choose a name that clearly represents your group—whether it’s your company name, department, or project team.
Remember, you can always change this later as your team evolves.
Action: Enter your desired team name in the text field (e.g., “Marketing Team,” “Development Squad,” or your company name). Then click “Next: Add Members.”
Pro tip: Choose a name that will be immediately recognizable to team members when they receive their invitations. Clarity over cleverness.

Step 5: Add Team Members and Assign Plans
This is where the magic happens. You can add multiple team members and assign each one an appropriate subscription level based on their needs.
The Process:
- Enter email address: Type the email address of each team member you want to invite
- Select their plan: Choose the appropriate subscription tier for each member from the dropdown
- Free tier: Perfect for occasional users or those just getting started
- Paid tiers: For power users who need advanced features and higher usage limits
- Add more members: Click “Add Member” to include additional team members
- Finalize: Once all members are added, click “Create Team & Pay”
Important:
- At least one team member must have a paid subscription
- All other members can remain on the free tier if desired
- Team members will receive invitation emails to join your AlmmaGPT workspace
- You can add or remove members at any time after creation

After Team Creation
Once your team is created, you’ll be redirected to your team dashboard where you can:
- Monitor team activity and usage patterns
- Manage subscriptions and upgrade or downgrade members as needed
- Add new members as your team grows
- Access team-wide settings and preferences
Best Practices for Team Management
Start Small, Scale Smart
Begin with your core team members and expand gradually. This allows you to establish workflows and best practices before rolling out to larger groups.
Mix and Match Subscriptions
Not everyone needs a premium subscription. Use the flexibility of our tiered system to optimize costs while ensuring power users have the resources they need.
Regular Review
Periodically review your team’s usage patterns to ensure everyone has the appropriate subscription level for their needs.
Troubleshooting Common Issues
Q: What if a team member doesn’t receive their invitation?
A: Check spam folders first. You can resend invitations from the team management dashboard.
Q: Can I transfer ownership of a team?
A: Yes, team ownership can be transferred to another member with a paid subscription through the team settings.
Q: How do I change payment methods?
A: Payment methods can be updated in your account settings under billing preferences.
The Path Forward
Creating a team on AlmmaGPT is just the beginning of your collaborative AI journey. As you and your team explore the platform’s capabilities, you’ll discover new ways to leverage artificial intelligence to amplify your collective productivity and creativity.
Remember, at Almma.AI, we’re not just building tools—we’re democratizing intelligence. Your team’s success is our mission, and we’re committed to making that success as accessible and achievable as possible.
Need Additional Support?
Our support team is ready to assist you at help@almma.ai. We’re also continuously improving our platform based on user feedback, so don’t hesitate to share your experiences and suggestions.
This guide reflects our commitment to the Dignity Principle by Almma—ensuring every user interaction respects individual needs while empowering collective achievement. Together, we’re minting the next generation of AI-enabled teams.
Leave a Reply