
Custom AI Agents let you use AlmmaGPT for your specific needs — whether you’re building a 24/7 customer service agent, a data analyst assistant, or a creative writing partner.
In just a few minutes, you can give your AI unique instructions, capabilities, and tools tailored to your goals, all without code.
Here’s how to do it step-by-step.
Step 1: Open the Agent Builder
Inside AlmmaGPT, go to the Agent Builder section and click the Create Agent button.

Step 2: Give Your Agent a Name
In the Name field, type something descriptive so you recognize it later.
Examples:
-
- “EduHelp Tutor – Math”
- “Marketing Blog Writer”
- “Legal Document Summarizer”
Step 3: Add an Optional Description
- Use this to explain what your Agent does in plain language.
- This is optional, but useful when you have many agents.
Example: “Provides summaries of uploaded legal contracts and flags risky clauses.”
Step 4: Write the Instructions
This is where your Agent’s “personality” and “mission” live. Think of instructions as the system prompt that will guide every interaction.
Tips:
- Begin by giving your agent a <BIO>, use a prompt like “Write the bio of an expert in the field(s) of : [INSERT FIELD(S)]”
- Next, add <ACTIONS> your agent will follow every time you make it work. Be clear about goals, tone, and behaviour.
- Feel free to add <FORBIDDEN ACTIONS> if you want the agent never to perform specific actions.
- You can use Variables if you want the Agent to adapt to different users or contexts dynamically.

Step 5: Choose Your Model
Click Model and select the AI brain your Agent will use.
- By default, it may show a specific model, but AlmmaGPT supports multiple models.
- If you’re not sure which to choose, check out our guide: The Complete Guide to Choosing the Right AI Model for Your Needs in AlmmaGPT.
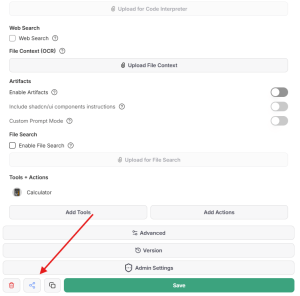
Step 6: Enable Advanced Capabilities (Optional)
You can add powerful functionality to your Agent:
1. Code Interpreter API – For running Python code, analysis, and calculations.
- Run Code – Tick this if your Agent needs to analyze data or generate code.
- Upload relevant files for the Code Interpreter if needed.
2. Web Search – Lets the Agent search the internet for real-time information.
3. File Context (OCR) – Lets the Agent read and extract text from uploaded documents/images.
Step 7: Activate Artifacts (Optional)
- Switch this on if you want your Agent to generate files or structured outputs during a conversation.
- You can also choose to include shadcn/ui component instructions for UI prototyping.
Step 8: Enable Custom Prompt Mode (Optional)
- This option allows the Agent to apply prompts in a more flexible or experimental way.
Step 9: Enable File Search (Optional)
- This lets your Agent search across uploaded documents for faster answers.
- You’ll need to upload reference files after enabling this.
Step 10: Add Tools (Recommended) and Actions
- Add Tools – Give your Agent specific external tool integrations.
- Add Actions – Script custom actions the Agent can trigger.

Step 11: Review Advanced Settings
Click Advanced for:
- Context window settings
- Temperature tuning (creativity level)
- API calling configurations
Step 12: Click Create
When happy with your settings, click the green Create button.
Your Agent will appear in your list, ready to deploy.
Step 13: Share your Agent
After you save your Agent, you can choose to share it with others. Click on the share icon to open the sharing menu.
Once on the sharing menu, Admins of AlmmaGPT Enterprise can choose to share the Agent with everyone. Turn on ‘Share with all users’.
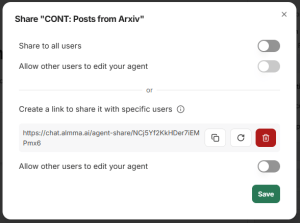
Users can click ‘Create link’ to send the Agent to others.
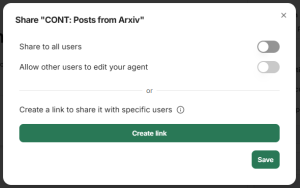
You can copy the Agent sharing link and send it to others, allowing them to edit the instructions or keep them private.
Pro Tips
- Start simple, then refine with more tools and instructions.
- Test the Agent with real-world cases before rolling it into
production. - Duplicate an Agent you like and tweak it for new purposes.
✅ Your Custom AI Agent is now ready to work for you — whether it’s answering customer questions, writing blog posts, analyzing code, or tutoring students.
Next steps: Learn how to create a Reusable Prompt in AlmmaGPT
Leave a Reply